
Laser level tools are essential for tiling floors or walls with precision, especially for DIY beginners. Achieving straight, level, and evenly spaced tiles can be challenging, but a cross line laser level removes the guesswork. By projecting clear, accurate reference lines, a laser level helps prevent crooked rows, uneven grout lines, and alignment errors, making tiling projects faster, cleaner, and more professional-looking.
In this detailed tutorial, we'll walk you through how to use a laser level for tile installation from start to finish. Whether you're laying floor tiles or installing wall tiles, these steps will help you get professional results.
Why Choose a Cross Line Laser Level for Tiling?
Traditional methods like chalk lines and bubble levels work, but they’re time-consuming and prone to human error. A modern cross line laser (especially a green beam model) offers:
- Instant, highly visible lines (green is 4× brighter than red)
- Self-leveling within ±3–4°
- 360° or multi-line projection for full-room coverage
- Durability for job-site use
For the best visibility and reliability, we recommend the KIPRIM Green Laser Level series — particularly the upgraded models with enhanced brightness.
Here are two excellent options:
- KIPRIM Green Laser Level Upgraded LV8 — Perfect for most home tiling projects with strong cross-line performance
- KIPRIM Green Laser Level LV8D with 5 Laser Lines — Ideal for larger spaces or more complex layouts with extra vertical and horizontal lines
Now, let's get into the step-by-step process.
Step 1: Prepare Your Workspace and Tools
Before turning on the laser:
- Clean the floor/wall thoroughly
- Find and mark your starting point (usually the center of the room or the main focal wall)
- Gather: laser level, tripod or mounting bracket, tiles, spacers, thinset/mortar, and safety gear
Tip: For floor tiling, determine your layout pattern (straight, diagonal, herringbone) first.
Here's an example of a cross line laser projecting bright green lines across a prepared floor:


Step 2: Set Up and Power On Your Laser Level
Most quality laser levels are self-leveling:
- Place the laser on a stable tripod or mounting surface at a comfortable height (usually knee to waist level for floors)
- Turn it on — the self-leveling mechanism will kick in (you'll hear a beep or see the light stabilize)
- Unlock the pendulum if needed (many models have a manual lock switch)
The cross line will project a perfect horizontal and vertical line.
See this setup in action with a bright green cross line ready for tile work:

Step 3: Align the Laser to Your Starting Point (Floor Tiling)
For floor tiles:
- Position the laser so the horizontal line runs through your first row starting point
- Rotate the laser (or the base) until the vertical line aligns with your center line or layout reference
- Use the cross point as your "zero" reference for the first tile
Pro tip: For diagonal layouts, rotate the laser 45° to create perfect diagonal reference lines.
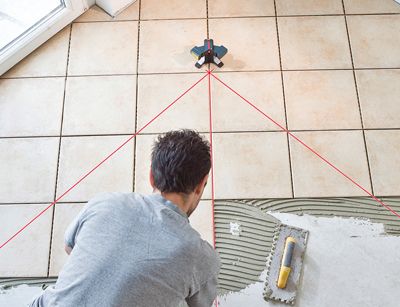
Check out how the laser creates perfect alignment across floor tiles:
Step 4: Use Vertical Lines for Wall Tiling
For backsplashes or shower walls:
- Set the laser higher (chest height works well)
- Project the vertical line to ensure each column of tiles stays plumb
- Use the horizontal line to keep rows perfectly level
This eliminates the need for constant measuring and marking.
Here's a clear example of vertical laser guidance on a wall tiling project:

Step 5: Check Alignment & Diagonal Squareness
After laying a few rows:
- Switch to diagonal mode (or rotate the laser) and project a diagonal line across the tiles
- Measure the distance from the laser line to tile edges — it should be consistent if your layout is square
- Adjust early if needed (it's much easier before the thinset sets!)
This quick diagonal check can save you hours of rework.
See the laser helping verify perfect squareness:

Common Mistakes to Avoid When Using a Laser Level for Tile
- Placing the laser too low/high (obstructs tile placement)
- Forgetting to check battery life mid-project
- Not using a tripod (handheld = shaky lines)
- Ignoring self-leveling limits (beyond ±4° the line may flash or turn off)
- Working in bright sunlight without a laser detector (green beams help, but detectors are best outdoors)
Final Thoughts
Using a laser level for flooring and wall tiling dramatically improves accuracy and speeds up the job. With a reliable green beam cross line laser, even first-time DIYers can achieve professional-grade results.
Ready to upgrade your tiling game? Check out the full KIPRIM laser level collection today, featuring bright, durable, and easy-to-use models perfect for your next project.
Happy tiling! 🛠️✨
0 Kommentare